Article
0 comment

Note to self: Crawling the web and stripping HTML and entities on the shell

notetoselfEver tried to download a list of strings from a web page? There are numerous solutions to such problems. Here is my sort of a toolbox solution which only uses shell commands. This means it’s scriptable for many sites/urls.

In my case the HTML contained the desired list of strings, each on it’s own line, each surrounded by <b> Tags. So we can filter out all lines not starting with a <b> tag:

curl http://sitename | egrep "^.*" | sed -e 's/<[^>]*>//g' > out.txt

If you try to crawl several sites, the for loop would look like this:

for sitename in site1 site2 site3; do
  curl http://$sitename | egrep "^.*" | sed -e 's/<[^>]*>//g' > $sitename.txt
done

This will leave us with (a) file(s) still containing HTML entities. To strip them from the file you can use a text based HTML browser like w3m:

echo "Hällo" | w3m -dump -T text/html

With our for loop over sites we have several text files which all need to be filtered. Use a “triangle swap” for that:

for sitename in site1 site2 site3; do
  cat "$sitename.txt" | w3m -dump -T text/html > tmp.txt; mv tmp.txt "$sitename.txt"
done

Happy crawling!

Article
0 comment

Numbering lines with Unix

notetoselfHave you ever had a csv file and wanted to import it into a database? And you would like to add a leading ID column numbered from 0, separated by, let’s say a colon? Here’s a hint: use the Unix pr (for print) utility:

pr -tn, -N0 test.csv | sed -e 's/^[ \t]*//' > new.csv

My test.csv contains a list of all world manufacturer ids (WMI) for car VINs (vehicle identification number). the first few rows look like:

AFA,Ford South Africa
AAV,Volkswagen South Africa
JA3,Mitsubishi

Please note that column headers are added later on. Now the output looks like this:

0,AFA,Ford South Africa
1,AAV,Volkswagen South Africa
2,JA3,Mitsubishi

Now for the curious: what does the command line do?
First for the pr part:

  • -t means: omit headers (remember: normally pr is used to print paginated content …)
  • -n, means: number lines. Use colon as a separator
  • -N0 means: start with 0

So much for that part. The pr utility normally numbers lines within a given column width (standard is 5 chars). This results in leading whitespace. We don’t want that, so the sed command removes spaces and tabs at the beginning of the line.
Enough Unix magic for now. Happy hacking!

Update: Detlef Kreuz just mentioned on Twitter, that this task could also be accomplished with awk:

awk -e '{print NR-1 "," $0;}' test.csv > new.csv

Here awk executes the commands inside the curly braces for every line of input. Each line will first print the line number minus 1, followed by a colon and the complete line. $0 is an internal awk variable containing the complete currect line, while $1, $2 … contain the split up fields (where to split is determined by FS, the field separator, which defaults to a space). Thanks Detlef!

Article
0 comment

Note to self: How to use screen

notetoselfThis posting will start a series of rather short articles, where I present things that I use from time to time but tend to forget how to do it :)
The first serving will deal with the undeniable useful Unix command screen. Screen can open a virtual screen, there you can start running long term processes and you can detach at any time and reattach later, while the process continues to run. You can view screen as a nohup on steroids. Start it with a blank shell and create a session with the symbolic name testo:

screen -S testo

You are greeted with … well, a fresh and clean shell. Here you can start doing things that will run a long time. To detach from that screen, use the key sequence ctrl-a d. Nearly all key sequences for screen start with crtl-a. And the “d” stands for “detach”. To see whats going on behind your back, use the screen list command:

screen -ls
There is a screen on:
        1387.testo      (31.07.2015 17:34:57)   (Detached)
1 Socket in /var/run/screen/S-vmg.

Here 1387.testo is the key to the session, consisting of the process id and the symbolic name:

ps auxf
…
 1387 ?        Ss     0:00 SCREEN -S testo
 1388 pts/2    Ss+    0:00  \_ /bin/bash

To reattach to the screen, you might have guessed it, you can use a screen reattach:

screen -r testo

You can detach and reattach to the screen as often as you like. When done with your long running processes, just log out of the screen using ctrl-d. You will be informed that the screen has been shut down:

[screen is terminating]
Article
3 comments

Adding a proxy to the Atom editor config on Windows

Atom-Logo Reading the user forum discussions about proxy configuration for atom can be a bit misleading for users on Windows. Suppose you’re running a recent Windows version. Suppose you’ve installed atom. Suppose you found out that the binary lives in

C:\Users\\AppData\Local\atom\app-1.0.2\atom.exe

(version number can be different …)
and suppose you are situated behind a corporate firewall/proxy which prevents you from installing packages and updates.
Looking around you can find postings specifying what to write into your .apmrc config file (which is the config of apm, the atom package manager). Now you look for that file and find it in

C:\Users\\.atom\.apm\.apmmrc

Every time you try to write some config to that file, it will be deleted, as it is autogenerated (just as the comment in the file says …).
The file, you are looking for probably is not existant yet. Just create one named

C:\Users\\.atom\.apmrc

and put in the following content:

https-proxy = http://:
http-proxy = http://:
strict-ssl = false

Replace and with your values. Save the file, restrt atom and you’re done. Seems hard to distibuish .atom.apmrc and .atom.apm.apmrc some times …

Article
0 comment

Playing around with services in grails console

Suppose you have a grails project and have witten a service doing some database magic to pull together data. Now suppose the very unlikely case that it’s not running that smooth than you thought. To expel the black magic you probably would like to use the grails console to play around with your domain classes and services. Using a service is as simple as importing the domain class and using it:

import myproject.Domainclass
def instance=Domainclass.get(3)
println instance.id+"\t"+instance.name

The service classes however are not that accessible to manipulation. You need to request the service bean instance by name from the application context named ctx:

def mcs=ctx.getBean("myCoolService")
def allThings=mcs.getAllThings()

Remember to use the (lowercase) instance name when calling getBean() just as it would be injected into your controller:

class GraphController {
    MyCoolService myCoolService
}

Pulling the strings together you can do more complex tests:

import myproject.Domainclass

def mcs=ctx.getBean("myCoolService")
def instance=Domainclass.get(3)
println instance.id+"\t"+instance.name
println "-----------------------------------------"
def allThings=mcs.getAllThings()
allThings.each { n -> println n.id+"\t"+n.thingstype+"\t\t"+n.name }

Hope that helps. As always: in case of questions or corrections / additions please leave a comment :)

Article
6 comments

Adding assets in Grails 3

When using modern web development technologies, you often come across frameworks or libraries which use additional resources apart from css stylesheets, images and javascript. One such example is Font Awesome, which needs sone font files, located in the /fonts subdirectory of the unzipped package. In Grails 2 lazy coders would put this directory in the /wep-app folder. In Grails 3 you should (!) use the asset pipeline for these files to and here are two ways that work:

  1. Simply put the files into the grails-app/assets/stylesheets folder. This is not a very elegant way nor is it the intended way to use the asset pipeline.
  2. Put the fonts directory parallel to stylesheets, images and javascript into the grails-app/assets/ folder. For the asset pipeline to know the new directory, specify it in the build.gradle file:
    assets {
        minifyJs = true
        minifyCss = true
        includes = ["fonts/*"]
    }
    

    Last thing to do is to patche the font file paths in the font-awesome.css and/or font-awesome.min.css file. Just remove the “../fonts/” part of the url() path, so they all look like this:

    font-family: 'FontAwesome';
    src: url('fontawesome-webfont.eot?v=4.3.0');
    

    Thats all.

This post by David Estes put me on the right track, since the official documentation doesn’t mention Grails 3 issues. Thanks David!

Article
0 comment

How to create OpenVPN config files for Witopia

I use a Dell laptop with Ubuntu 15.04 and the VPN NetworkManager seems to be sort of broken. So I guessed I just resort to plain old OpenVPN Config files. And since I’m a very lazy guy I wanted to have some sort of script generating all that stuff for me. First of all you need a prototype template for the config file. There is one that comes with the downloadable zip from Witopa and is called “SampleConfig.txt”. Copy that to “prototype.txt” and change the line

remote [REPLACE WITH SERVER NAME] 1194

to

remote SERVERNAME 1194

Our script will later on replace the “SERVERNAME” with the actual Witopia VPN server names. In the directory where “prototype.txt” lives, create a subdirectory and put the crypto files from the Witopia zip in. These are: ca.crt, ta.key, USERNAME.crt, USERNAME.key. “USERNAME” will be your username (think you guessed that :)
Now create in the prototype directory a file called “createConfigs.sh” with the following content:

#!/bin/bash

rm -f data/*.ovpn

serverlist=`curl -s https://www.witopia.net/?faq-item=openvpn-ssl-gateway-locations | sed -e "s/<[^>]*>//g" | egrep "^vpn"`

for server in $serverlist;
do 
  filename=data/`echo $server | cut -d . -f 2 - | sed 's/\([a-z]\)\([a-z]*\)/\U\1\L\2/g'`.ovpn;
  echo "Generating $filename";
  cat prototype.txt | sed "s/SERVERNAME/$server/g" > $filename
done

Line 3 cleans up the data directory for the files to come. Line 5 grabs the web page with the VPN server pages from Witopia.net, eliminates the HTML stuff via sed and greps lines starting with “vpn”. Then we loop through the server list and create an OpenVPN config file in data/ for each server, named “City.ovpn”. First we need to build the filename by grabbing the second field of the server name like “vpn.munich.witopia.net”. We cut the city name out and capitalize the first character. This is my personal preference, you can just leave it lower case if you like. Last part is replacing “SERVERNAME” with the actual server naame via sed and putting it in a file with the freshly created name. Thats it.

But if you are as lazy as me you also would like to have a start script which only needs the name of a city to connect you. Here we go:

#!/bin/bash

city=`echo $1 | sed "s/\.ovpn//g" | tr '[:upper:]' '[:lower:]' | sed 's/\([a-z]\)\([a-z]*\)/\U\1\L\2/g'`
filename="$city.ovpn"

if [ -e "$filename" ]
then
  echo "Starting OpenVPN with $city"
  sudo openvpn --client --config $filename --ca ca.crt
fi

This script called “start.sh” resides in the data/ directory takes one argument: the name of a city or of a *.ovpn config file. So valid start script calls are:

./start.sh munich
./start.sh Munich
./start.sh MUNICH
./start.sh munich.ovpn
./start.sh Munich.ovpn
./start.sh MUNICH.ovpn

As you can see line 3 of the script cuts out the city name, casts all characters to lower case and capitalizes the first character. Then we (re-)add the extension “.ovpn” in line 4 and if there is a config file with that name we start the openvpn client. We need to do that as root user so you problably will need to enter your root password when the openvpn is sudoed.

Thats it, folks. Happy networking :)

Article
0 comment

Separating structure and semantics

There is a great and simple rule, known as “Micha’s Golden Rule”, which goes back to Micha Gorelick (@mynameisfiber). It states:

Do not store data in the keys of a JSON blob.

This means, that instead of writing a JSON dataset holding people and their gaming scores like this:

{
  "Volker": 100,
  "John": 300
}

you should use something like:

[
  {
    "name": "Volker",
    "score": 100
  },
  {
    "name": "John",
    "score": 300
  }
]

First of all, it is good practice, to separate data and its meaning. Second it simplifies software development. And here is why:

One reason is, that in the first form you have no idea, what exactly the number associated with the name means. And when accessing the data you need to know the keys. But the keys are part of the data. So you first have to parse the whole file, separate the keys and iterate over them. In the second case you can iterate over a set of completely identical structured data sets and fetch names and scores.

This rule not only holds true for JSON but for any structured data like XML or yaml. Consider the following modified XML example from the SimpleXML section of the PHP manual:


  PHP: Behind the Parser
  Rasmus Lerdorf
  1
 

In PHP you would access the director in this way:

movie[0]->director;
?>

Now if you would like to use the directors name as a key to get the number of oscars he won, it would look like:


  PHP: Behind the Parser
  1
 

This is perfectly valid but stupid XML. And to access the data you need to know the name of the director:

movie[0]->RasmusLerdorf;
?>

Doesn’t make too much sense, hm? One additional drawback I didn’t mention but that you nevertheless saw: the keys of a data structure language often are subject to several limitaions. In XML element names e.g. there can’t be spaces. So you have to work around that e.g. by camelcasing the name. To get the name back in readable form, you would have to parse it and insert spaces at the correct positions. Which can be impossible with human names, since there are camelcased names like “DeLorean”.

Considering this rule is not always obvious but can save you a lot of nerves. Take care!

Article
0 comment

I wish I could look at that in my browser …

Sometimes you would like to see some information, which is readily available from a unix command in your browser. If it’s in a private network and / or the information doesn’t do any harm when read by unauthorized people or it’s for a rather short period of time, then ashttp does the trick.
ashttp is a python script by Julien Palard (@sizeof) using a headlesss vt100 terminal emulator to run a script each time the http server gets a request, grab the output and deliver it via http to the requesting browser.
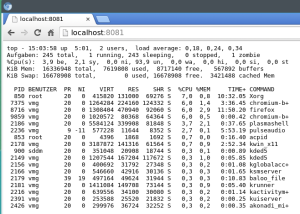
For example the output of top:

ashttp -p 8081 top

This will start up an http server on port 8081 (you can also use –port) and every request to that server will deliver the output of a fresh top command:
ashttp_top
At the moment there seems to be a small problem with forwarding the command line parameters of the unix command, so you can circumvent that by putting your more complex statement into a shebang’ed shell script and calling this one from ashttp:

#!/bin/bash
watch -n1 ls -lah /tmp

Have fun!

Update: @n770 correctly mentioned, that having swig installed is a prerequisite to building the python hl_vt100 module.

Article
0 comment

Junk in, junk out

When I was at school – yes, this was some time ago – I had a colleague who was at constant war with his frensh language teacher and the teacher with him. So once when writing an exam, in the end my colleague returned a piece of paper to the teachers desk, containing a longer monologue sayingwhy the student absolutely didn’t feel like writing an exam. The whole text was written in a large spiral on the paper.

When the exams were returned, my colleague got his paper back, signed by a note of “6”, which in Germany is the worst note you can get. The explanation of why the teacher voted for a 6 was written around the figure “6” … in a spiral.


One story I read on the internets said, that a student of english literature got back his very very bad exam with a remark from the teaher:

I return this otherwise good writing paper back to you, because someone wrote gibberish all over it and put your name on top.

I like this sense of humour!