Article
7 comments

How to install dependencies from a requirements.txt file with conda

Just a little reminder: pip has this very useful option to install a bunch of packages from a single text file mostly called requirements.txt. Anaconda’s command line tool conda doesn’t support this option directly. It does support reading the package names from a file using the –yes and –file option

conda install --yes --file requirements.txt

but that does not automatically install all the dependencies. To do this, we need to iterate over the file and install each package in “single package mode”:

while read requirement; do conda install --yes $requirement; done < requirements.txt

Thanks to Luis Capelo for this snippet which I use to install dependencies in a dockerized instance of Anaconda / Jupyter (more on that in a later post).

Article
1 comment

Note to self: bash path hashing /o\

Did you ever stumble across something like this:

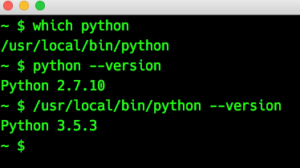
Yes, this is strange, isn’t it? The PATH variable is set in the correct order (this is why ‘which’ finds the local Python). Googling about this behavior at first didn’t bring up any solution. But then I came across this now closed question on Stackoverflow.

So once you know what you are looking for Google reveals lots and lots of people having trouble with path hashing. Now, my solution was quite simple:

~ $ type python
python is hashed (/usr/bin/python)
~ $ hash -t python
/usr/bin/python
~ $ hash -d python
~ $ hash -t python
-bash: hash: python: not found
~ $ which python
/usr/local/bin/python
~ $ python --version
Python 3.5.3

PS: To clear the complete bash path cache just use “hash -r”.

Article
0 comment

Note to self: Allow to run applications from unverified sources on MacOS X Sierra 10.12

Every now and then I stumble across some more or less cool application I install on my Mac. Some of them were built by authors not verified by Apple. Whenever this happens you see a box popping up telling you that you can’t run that app. You can go to the security / Gatekeeper pref pane and allow for this app for this time to run but the option just to allow all unverified apps to start is gone since 10.11 I suppose.

Since Apple very seldom removes a functionality from a new release there is a way to switch to allowing those apps from the command line. I found a solution on the german Mac site MacGadget:

sudo spctl --master-disable

This works just like to old option setting. HTH.

Article
0 comment

Note to self: How to count things in Groovy collections

notetoselfThis time I would like to add a short note on how to find things in Groovy collections. Remember: collections is the general term for lists and maps, in other languages sometimes referred to as arrays or dictionaries.

Groovy has a standard method to count all elements of a collection. It is called size():

l=[1,2,33]
println l.size() // yields 3

If you need to know the number of elements in a collection that fit a certain filter, it’s time to switch to count(). Count takes a closure and counts all elements, for which the closure yields true. This can bes as simple as counting all elements larger than 3:

l=[1,2,33]
println l.count { it>3 } // yields 1

Now what, if the elements of the list are  objects and I want to filter by a specific feature of the objects. No problem:

class obj {
    def i
    def j
    
    def obj(in_i, in_j) {
        i=in_i
        j=in_j
    }
    
    String toString() {
        return "obj($i, $j)"
    }
}

def a=new obj(1,1)
def b=new obj(1,2)
def c=new obj(1,3)
def list=[a, b, c]

println list.count { it.j>1 } // yields 2, i.e. counts b and c

With maps it’s a bit more tricky. The it object inside the closure is of type LinkedHashMap$Entry, so we have to deal with its key and value attributes:

class obj {
    def i
    def j
    
    def obj(in_i, in_j) {
        i=in_i
        j=in_j
    }
    
    String toString() {
        return "obj($i, $j)"
    }
}

def a=new obj(1,1)
def b=new obj(1,2)
def c=new obj(1,3)
def list=[eins: a, zwei: b, drei: c]

println list.count { it.value.j>1 } // again yields 2

Hope that helps.  See you next time!

Article
0 comment

Note to self: Crawling the web and stripping HTML and entities on the shell

notetoselfEver tried to download a list of strings from a web page? There are numerous solutions to such problems. Here is my sort of a toolbox solution which only uses shell commands. This means it’s scriptable for many sites/urls.

In my case the HTML contained the desired list of strings, each on it’s own line, each surrounded by <b> Tags. So we can filter out all lines not starting with a <b> tag:

curl http://sitename | egrep "^.*" | sed -e 's/<[^>]*>//g' > out.txt

If you try to crawl several sites, the for loop would look like this:

for sitename in site1 site2 site3; do
  curl http://$sitename | egrep "^.*" | sed -e 's/<[^>]*>//g' > $sitename.txt
done

This will leave us with (a) file(s) still containing HTML entities. To strip them from the file you can use a text based HTML browser like w3m:

echo "Hällo" | w3m -dump -T text/html

With our for loop over sites we have several text files which all need to be filtered. Use a “triangle swap” for that:

for sitename in site1 site2 site3; do
  cat "$sitename.txt" | w3m -dump -T text/html > tmp.txt; mv tmp.txt "$sitename.txt"
done

Happy crawling!

Article
0 comment

Numbering lines with Unix

notetoselfHave you ever had a csv file and wanted to import it into a database? And you would like to add a leading ID column numbered from 0, separated by, let’s say a colon? Here’s a hint: use the Unix pr (for print) utility:

pr -tn, -N0 test.csv | sed -e 's/^[ \t]*//' > new.csv

My test.csv contains a list of all world manufacturer ids (WMI) for car VINs (vehicle identification number). the first few rows look like:

AFA,Ford South Africa
AAV,Volkswagen South Africa
JA3,Mitsubishi

Please note that column headers are added later on. Now the output looks like this:

0,AFA,Ford South Africa
1,AAV,Volkswagen South Africa
2,JA3,Mitsubishi

Now for the curious: what does the command line do?
First for the pr part:

  • -t means: omit headers (remember: normally pr is used to print paginated content …)
  • -n, means: number lines. Use colon as a separator
  • -N0 means: start with 0

So much for that part. The pr utility normally numbers lines within a given column width (standard is 5 chars). This results in leading whitespace. We don’t want that, so the sed command removes spaces and tabs at the beginning of the line.
Enough Unix magic for now. Happy hacking!

Update: Detlef Kreuz just mentioned on Twitter, that this task could also be accomplished with awk:

awk -e '{print NR-1 "," $0;}' test.csv > new.csv

Here awk executes the commands inside the curly braces for every line of input. Each line will first print the line number minus 1, followed by a colon and the complete line. $0 is an internal awk variable containing the complete currect line, while $1, $2 … contain the split up fields (where to split is determined by FS, the field separator, which defaults to a space). Thanks Detlef!

Article
0 comment

Note to self: How to use screen

notetoselfThis posting will start a series of rather short articles, where I present things that I use from time to time but tend to forget how to do it :)
The first serving will deal with the undeniable useful Unix command screen. Screen can open a virtual screen, there you can start running long term processes and you can detach at any time and reattach later, while the process continues to run. You can view screen as a nohup on steroids. Start it with a blank shell and create a session with the symbolic name testo:

screen -S testo

You are greeted with … well, a fresh and clean shell. Here you can start doing things that will run a long time. To detach from that screen, use the key sequence ctrl-a d. Nearly all key sequences for screen start with crtl-a. And the “d” stands for “detach”. To see whats going on behind your back, use the screen list command:

screen -ls
There is a screen on:
        1387.testo      (31.07.2015 17:34:57)   (Detached)
1 Socket in /var/run/screen/S-vmg.

Here 1387.testo is the key to the session, consisting of the process id and the symbolic name:

ps auxf
…
 1387 ?        Ss     0:00 SCREEN -S testo
 1388 pts/2    Ss+    0:00  \_ /bin/bash

To reattach to the screen, you might have guessed it, you can use a screen reattach:

screen -r testo

You can detach and reattach to the screen as often as you like. When done with your long running processes, just log out of the screen using ctrl-d. You will be informed that the screen has been shut down:

[screen is terminating]
Article
0 comment

I wish I could look at that in my browser …

Sometimes you would like to see some information, which is readily available from a unix command in your browser. If it’s in a private network and / or the information doesn’t do any harm when read by unauthorized people or it’s for a rather short period of time, then ashttp does the trick.
ashttp is a python script by Julien Palard (@sizeof) using a headlesss vt100 terminal emulator to run a script each time the http server gets a request, grab the output and deliver it via http to the requesting browser.
For example the output of top:

ashttp -p 8081 top

This will start up an http server on port 8081 (you can also use –port) and every request to that server will deliver the output of a fresh top command:
ashttp_top
At the moment there seems to be a small problem with forwarding the command line parameters of the unix command, so you can circumvent that by putting your more complex statement into a shebang’ed shell script and calling this one from ashttp:

#!/bin/bash
watch -n1 ls -lah /tmp

Have fun!

Update: @n770 correctly mentioned, that having swig installed is a prerequisite to building the python hl_vt100 module.