Article
0 comment

Use a private repository as source of a composer package

Sometimes I need to make a small change to a composer package, often in a Symfony project. It is a really bad idea to just go into the vendor directory of the package and change some code. It’s much better to fork the corresponding repository, apply your change and build a new release. Then you can use that in a composer.json file.

Fork the repository

For the purpoe of demonstration I will create a customized version of Javier Eguiluz’s EasyAdmin bundle for Symfony. So go to the github page of the EasyAdmin bundle and click on the “Fork” button in the top right corner. Github will create a fork for you under your own user account. Clone that repository and make your changes. For this is one line in the file src/Form/Util/LegacyFormHelper.php as I mentioned in the last posting.

Build a new release

Now we’re ready to build a new release. Go to the “releases” tab in your forked repository and click on “Draft a new release”. Define a new tag version (unimportant how you call it, I normally just count up the original release version). I normally enter something like “for private use only” into the “Release title” field but you just can leave that empty. Once you’re done you can submit via “Publish release”. You will be brought back to the release list and see your new release tagged with a green label saying “Latest release”. You just built your first release \o/

Use the release in a composer.json file

You now can change your composer.json file. First you need to add the repository. By default composer will look up the packagist repository. If you define a different one in the json file this local one will be searched first before falling back to the public repo. So we need to create a repository section and list the github repository. Mine looks like this:

"repositories": [
    { "type": "vcs", "url": "git@github.com:vmgforks/EasyAdminBundle.git" }
],

The type is “vcs” (version control system) and the URL is your forked repository. I like to keep forks in a organization of its own called “vmgforks”. Now we can require the package by using its original name and the required version just is “*”:

"javiereguiluz/easyadmin-bundle": "*",

Now update the composer.lock and download and install the package by:

composer update

Now you can check if the change made it to the vendor directory.

Article
3 comments

Getting to work the CKEditor plugin for EasyAdmin in Symfony 4

Developing with Symfony 4 can sometimes be a bit challenging as some of the most widely used bundles are not yet ported to Symfony 4 or never will be (like FOSUserBundle). And sometimes a bundle works pretty well but one of its third party plugins/bundles doesn’t. This is the case with the brilliant EasyAdmin bundle. Sometimes you might want to offer a WYSIWYG editor to a backend user. For this case there is a bundle called IvoryCKEditorBundle that integrates the famous CKEditor into the form component. But the Ivory bundle not (yet) supports Symfony 4 so a helpful soul created a fork and called the package hillrange/ckeditor so you can use CKEditors in nearly any form.

Nearly any but not EasyAdmin. We come to that later. First let’s see how it would work if it worked (that is a sentence, isn’t it?). In Symfony 4 the EasyAdmin config can be found in config/packages/easy_admin.yaml. For a simple entity that only contains a text attribute (of type “text” who would have guessed?) that we would like to WYSIWYG edit it would look something like this:

easy_admin:
  entities:
    entry:
      class: App\Entity\Entry
      form:
        fields:
          - { property: 'text', type: 'ckeditor', type_options: { trim: true } }

The field type is called “ckeditor”. For this to work EasyAdmin has an array of supported field types and this out of the box also contains an entry for the ckeditor type. It can be found in vendor/javiereguiluz/easyadmin-bundle/src/Form/Util/LegacyFormHelper.php and is called $supportedTypes. And this is why the Hillrange package doesn’t play well with EasyAdmin. The form class just has another name. The original line reads

'ckeditor' => 'Ivory\\CKEditorBundle\\Form\\Type\\CKEditorType',

and can be changed into

'ckeditor' => 'Hillrange\\CKEditor\\Form\\CKEditorType',

Doing so in the original EasyAdmin bundle in the vendor directory is a bad idea. My approach is a bit overkill but offers a clean and regular approach:

  1. Fork the EasyAdmin bundle on github
  2. Change the incriminating line as proposed
  3. Build a release of “your own EasyAdmin”
  4. Include that with the composer.json file to be pulled directly from github

How the latter works will be subject to the next posting. So stay tuned ;)

PS: At some point in the future the IvoryCKEditorBundle will be Symfony 4 ready (at least I hope so) and you will be able to turn back the composer.json entry to the original package.

Article
0 comment

Docker based dev environment with PHP 7, MariaDB, phpMyAdmin, Mailhog & ELK stack

Docker can be used as a flexible development environment for (web) applications. With docker-compose you can add up several services to a complete scenario. Here I would like to present a new setup that contains a lot of things to make a developers life more comfortable, notably:

If you don’t need all these components, you always can disable whatever you’re not going to use. Your application will reside in the html subdirectory, the MySQL/MariaDB db files will be in the mysql directory so nothing is lost when you shut down the services.

If you need something else (PostgreSQL e.g.) please let me know and I will add it. Have fun!

Article
0 comment

Run Oxid CE V6 locally using Docker and docker-compose

Recently the public availability of Oxid eShop V6.0.0 was announced. And it finally runs with PHP7 and is a major step towards a modern and comfortable web shop.

If you would like to test it locally or develop with it there are many options. Some time ago another one, flexible and versatile, opened: Docker.

In this GitHub repository I assembled an environment with:

  • Apache webserver with PHP 7.1 and all extensions needed (and xdebug)
  • MariaDB
  • phpMyAdmin
  • ELK stack to analyse and show apache log files

If you encounter any problems or bugs please file an issue with GitHub. I’m here and on Twitter to answer any question you might have. Have fun!

Article
7 comments

How to install dependencies from a requirements.txt file with conda

Just a little reminder: pip has this very useful option to install a bunch of packages from a single text file mostly called requirements.txt. Anaconda’s command line tool conda doesn’t support this option directly. It does support reading the package names from a file using the –yes and –file option

conda install --yes --file requirements.txt

but that does not automatically install all the dependencies. To do this, we need to iterate over the file and install each package in “single package mode”:

while read requirement; do conda install --yes $requirement; done < requirements.txt

Thanks to Luis Capelo for this snippet which I use to install dependencies in a dockerized instance of Anaconda / Jupyter (more on that in a later post).

Article
0 comment

Docker automation for PHP Developers using Python

Introduction

This posting will deal with using Docker on the developer desktop. I will not talk about deploying these containers to other stages of the track to production. Maybe this is a topic for a follow-up by me or by someone who is more apt with all things devops.

All this started when I realized, that docker-compose.yml needs an absolute path on the host for its shared volumes. This is OK but when you would like to have multiple development setups for multiple projects. What I wanted was a single config file to rule a complete set of Dockerfile and docker-compose.yml files. And a comandline tool to manage that environment without the need to juggle around with several other tools and numerous options and flags.

An intermediary state consisted of a Makefile with several shell scripts for all the stuff that was hard to do in Makefiles. It worked but was a bunch of files. I wanted something cleaner with more possibilities for the future and fewer helper files.

So here it is: a Python file to rule them all (sorry for the pun …) and build Dockerfile and docker-compose.yml from templates and a config.yml file when booting up the environment. The repository is here: https://github.com/vgoebbels/docker-php7

What you get

  • An Apache running PHP7.1 on http://localhost with document root (/var/www/html) as a shared volume in the www subdirectory
  • A MySQL database connected to that PHP container
  • A PHPMyAdmin listening on http://localhost:8080

Usage

  1. Check out from the Github repo above. Don’t mind the actual path to your environment. This will be determined and inserted into the docker-compose.yml file by the Python script.
  2. Install the required Python modules with
    pip install -r requirements.txt
  3. Have a look at the templates in the templates subfolder
  4. Edit the configuration options in config.yml
  5. Boot the setup using
    ./dockshell up
  6. Have a look at the running containers with
    ./dockshell status

What doesn’t work yet

Using ./dockshell sshweb and ./dockshell sshsql to log into the running containers. Was not able to enter interactive mode. You will have to use:

docker container exec -it <CONTAINERNAME_HERE> /bin/bash

Caveats

  • ./dockshell clean removes all containers and images. And I mean all of them. This needs to be fixed!


Article
1 comment

Note to self: bash path hashing /o\

Did you ever stumble across something like this:

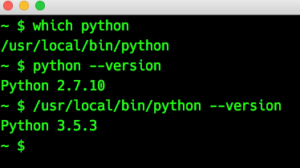
Yes, this is strange, isn’t it? The PATH variable is set in the correct order (this is why ‘which’ finds the local Python). Googling about this behavior at first didn’t bring up any solution. But then I came across this now closed question on Stackoverflow.

So once you know what you are looking for Google reveals lots and lots of people having trouble with path hashing. Now, my solution was quite simple:

~ $ type python
python is hashed (/usr/bin/python)
~ $ hash -t python
/usr/bin/python
~ $ hash -d python
~ $ hash -t python
-bash: hash: python: not found
~ $ which python
/usr/local/bin/python
~ $ python --version
Python 3.5.3

PS: To clear the complete bash path cache just use “hash -r”.

Article
0 comment

Note to self: Allow to run applications from unverified sources on MacOS X Sierra 10.12

Every now and then I stumble across some more or less cool application I install on my Mac. Some of them were built by authors not verified by Apple. Whenever this happens you see a box popping up telling you that you can’t run that app. You can go to the security / Gatekeeper pref pane and allow for this app for this time to run but the option just to allow all unverified apps to start is gone since 10.11 I suppose.

Since Apple very seldom removes a functionality from a new release there is a way to switch to allowing those apps from the command line. I found a solution on the german Mac site MacGadget:

sudo spctl --master-disable

This works just like to old option setting. HTH.

Article
0 comment

Graph libraries – D3.js

One of the best known visualization frameworks is D3.js. Written by Mike Bostock, the data visualization superstar about whom Edward Tufte said “that he will become one of the most important people for the future of data visualisation” (according to Wikipedia). And who am I to object to Edward Tufte?

So D3 is in its core an SVG handling library around which several so called layouts for different (actually a lot of) types of diagrams gather. One of them is the so called force-directed graph, which is exactly what we will use here.

How does it look?

This is a real physical simulation (although featuring some shortcuts for reduced calculation time) which means that the arrangement of the nodes when reloading the page is a new one every time and dragging around one node lets the others wobble around. One of the shortcuts is that the repulsive force only is active between nodes connected. So dangling ends can cross edges with the rest of the graph. Nevertheless playing around with the mesh can be fun for some time. The complete source code can be found in the GitHub-Mark-32px GitHub repository

How does it work?

Once again it all starts with including the libraries:

<script src="/graphs/common/jquery-2.1.3.js"></script>
<script src="/graphs/common/d3.js"></script>

The we add some style for nodes and text:

<style>
    .node g text {
        font: 10px sans-serif;
        pointer-events: none;
        text-anchor: middle;
    }
    .node:not(:hover) .nodetext {
        display: none;
    }
    text {
        fill: #000;
        font: 10px sans-serif;
        pointer-events: none;
    }
</style>

Next we define some variables:

var width = 800, height = 500;
var n = 10000, force, svg, drag;

The first line defines width and height of the SVG element, the second line defines n as the number of iterations to be done (I’ll explain later) and the global variables force, svg and drag.

Next we need to define the nodes and edges or links. For the sake of simplicity I’ll do that once again inline. In a real application you would load the dataset in the background:

var nodes = [
    {
        "name": "Node 1",
        "nodeid": 1,
        "nodecolor": "#88cc88",
        "x": 0,
        "y": 0,
    },
...
    {
        "name": "Node 6",
        "nodeid": 6,
        "nodecolor": "#888888",
        "x": 0,
        "y": 0,
    }
];
var links = [
    {
        "source": 0,
        "target": 1,
        "linkcolor": "#888888"
    },
...
    {
        "source": 3,
        "target": 5,
        "linkcolor": "#888888"
    }
];

Then I wrapped up the whole generation and execution of the graph into a function called performGraph():

function performGraph() {
    force = d3.layout.force()
            .charge(-1000)
            .theta(1)
            .linkDistance(170)
            .size([width, height])
            .on("tick", tick);
    drag = force.drag()
            .on("dragstart", dragstart)
            .on("dragend", dragend);
    svg = d3.select("body").append("svg")
            .attr("id", "thissvg")
            .attr("width", width)
            .attr("height", height);
    link = svg.selectAll(".link");
    node = svg.selectAll(".node");
    force.nodes(nodes).links(links);
    force.start();
    for (var i = n; i > 0; --i) {
        force.tick();
    }
    force.stop();
    link = link.data(links)
            .enter()
            .append("g")
            .attr("class", "glink")
            .append("line")
            .style("stroke-width", "3")
            .attr("class", "link")
            .attr("x1", function (d) {
                return d.source.x;
            })
            .attr("y1", function (d) {
                return d.source.y;
            })
            .attr("x2", function (d) {
                return d.target.x;
            })
            .attr("y2", function (d) {
                return d.target.y;
            })
            .attr("stroke", function (d) {
                return d.linkcolor;
            });
    node = node.data(nodes)
            .enter().append("g")
            .attr("class", "node")
            .attr("nodeid", function (d) {
                return d.nodeid
            })
            .attr("transform", function (d) {
                return "translate(" + d.x + "," + d.y + ")";
            });
    node.append("circle")
            .attr("r", "15")
            .attr("fill", function (d) {
                return d.nodecolor;
            })
            //.attr("fill", "#888888")
            .attr("fill-opacity", "1")
            .attr("cx", "0")
            .attr("cy", "0");
    node.append("text")
            .attr("x", 12)
            .attr("dx", "0.5em")
            .attr("dy", "0.5em")
            .attr("class", "nodecaption")
            .attr("display", "inline")
            .text(function (d) {
                return d.name;
            });
    node.call(drag);
}

Lines 2 to 7 set up the force layout engine with some physical parameters, the width and height and an event handler for the ticks. Ticks are D3’s simulation steps. For every tick, a function is called and the positions of the elements are recalculated. We’ll discuss the tick function further down.

Then we define a drag event listener in line 8 to 10 binding its events to two functions called dragstart and dragend. More on those later. Lines 11 to 14 show how to manipulatie the DOM using D3 by adding an SVG element with some attributes to the body.

Lines 15 and 16 handle one of the (for me) most counterintuitive features of D3: we select DOM elements by class that aren’t yet there. Line 17 attaches the nodes and links datasets to the force layout. Line 18 kicks off the physical simulation, line 22 stops it. The for-loop in between counting down from 10000 (the n variable, you remember?) executes 10000 times the force.tick() function. We also could have started the simulation and let it run infinitely but this start-stop handling provides for a steady graph instead of one always wiggling around a bit.

Lines 23 to 44 define, what to do with the links by appending a g (for group) SVG element to the SVG canvas and adding line to the group. Lines 45 to 53 do something similar with the nodes adding a group and a transformation function. In lines 54 to 62 we add a AVG circle element using the nodecolor attribute from the nodes dataset. Lines 63 to 71 finally add the text label to the nodes. Line 72 eventually binds the nodes to the drag event object to allow for the dragging of nodes with a mouse.

Now we need to define all the helper functions bound to event listeners in code above. First the tick() function to do the simulation steps:

function tick() {
    link.attr("x1", function (d) {
        return d.source.x;
    })
    .attr("y1", function (d) {
        return d.source.y;
    })
    .attr("x2", function (d) {
        return d.target.x;
    })
    .attr("y2", function (d) {
        return d.target.y;
    });
    node.attr("transform", function (d) {
        return "translate(" + d.x + "," + d.y + ")";
    });
}

And the dragging functions:

function dragstart(d) {
    force.stop();
}

function dragend(d) {
    force.stop();
}

The last thing to do: kick it to action by calling performGraph():

performGraph();

Why exactly did I put all the code into a function to call it in the end? In a real application you would have some additional GUI elements for example to switch on and of different types of nodes or labels etc. Every time this is done we need to recalculate the graph. Now this can be done with one function call.

Article
0 comment

Innovation means breaking the rules

6264574707_47f374a312_oToday I paged through a book by Martin Gaedt, called “Rock your idea”. Despite the  english title the book is written in German. One of the first and central ideas presented there was:

Innovation means to break the rules.

I’ve been scientific and innovation enabler for several projects and companies now and this is nearly all you need to know about injecting new ideas or technology into companies.

If you want to work out a totally different and optimal solution for a given  problem or even want to create a new area of business, you have to break the rules.

  • The rules defining what is possible. Maybe someone just invented the technology needed to build your idea. You might at the moment not know that.
  • The rules what we think customers need or want. Ever heard that argument “None of our customers asked for that! Why should we build that?”?.
  • The rules of the existing business. Ever heard that your idea doesn’t fit into the portfolio of the company? WHAT THE HECK? The portfolio is where the money is, for God’s sake!
  • And sometimes even the rules of hierarchy. Having an innovator working ‘at a short leash’ often means preventing innovation. Sometimes managerial control is the worst you can do to harm your company.

So to reformulate the negative arguments to positive actionable items:

  • When having a new idea, don’t instantly think about existing technology to build it. When you need it, there will be a solution. There always was one when I needed it. Finding technical solutions is the job of people like me.
  • When you don’t know if a customers will buy into your idea, TALK TO THEM. Sometimes you will get a piloting customer aboard for an idea that is nothing more than that: an idea. Sometimes you will have to invest a small amount of money and time into a prototype or mockup to win a customers interest.
  • If you only look for ideas fitting into an existing portfolio, I’m sorry to tell you, that your company will not have any chances to survive a future disruptive change in its very own field of business. There will be someone else having a similar idea and with no reluctance to realize it, portfolio or not.
  • If you have people working for you on innovative ideas, trust them. At least a bit further than you feel comfortable with. Micromanaging people is a great way to let them look for another company that offers a broader field of work. If you expect your researchers to follow working instructions to the point you’re exactly missing the point.