Article
6 comments

Running Dash in Docker

This is part one of a short series of posts about Dash.
The repository for this blog posts is here.

Dash is an application framework to build dashboards (hence the name) or in general data visualization heavy largely customized web apps in Python. It’s written on top of the Python (web) micro-framework Flask and uses plotly.js and react.js.

The Dash manual neatly describes how to setup your first application showing a simple bar chart using static data, you could call this the ‘Hello World’ of data visualization. I always like to do my development work (and that of my teams) in a dockerized environment, so it OS agnostic (mostly, haha) and the everyone uses the same reproducible environment. It also facilitates deployment.

So let’s gets started with a docker-compose setup that will probably be all you need to get started. I use here a setup derived from my Django docker environment. If you’re interested in that one too, I can publish a post on that one as well. The environment I show here uses (well, not for the Hello World example, but at some point you might need a database, so I provide one, too) PostgreSQL, but setups with other databases (MySQL/MariaDB for relational data, Neo4J for graph data, InfluxDB for time series data … you get it) are also possible.

We’ll start with a requirements.txt file that will hold all the pyckages that need to be installed to run the app:

psycopg2>=2.7,<3.0
dash==1.11.0

Psycopg is the Python database adapter for PostgreSQL and Dash is … well, Dash. Here you will add additional database adaptors or other dependencies your app might use.

Next is the Dockerfile (and call it Dockerfile.dash) to create the Python container:

FROM python:3

ENV PYTHONUNBUFFERED 1
RUN mkdir /code
WORKDIR /code

COPY requirements.txt /code/
RUN pip install -r requirements.txt
COPY . /code/

We derive our image from the current latest Python 3.x image, the ENV line sets the environment variable PYTHONUNBUFFERED for Python to one. This means, that stdin, stdout and stderr are completely unbuffered, going directly to the container log (we’ll talk about that one later).
Then we create a directory named code in the root directory of the image and go there (making it the current work directory) with WORKDIR.
Now we COPY the requirements.txt file into the image, and RUN pip to install whatever is in there.
Finally we COPY all the code (and everything else) from the current directory into the container.

Now we create a docker-compose.yml file to tie all this stuff together and run the command that starts the web server:

version: '3'

services:

  pgsql:
    image: postgres
    container_name: dash_pgsql
    environment:
      - POSTGRES_DB=postgres
      - POSTGRES_USER=postgres
      - POSTGRES_PASSWORD=postgres
    ports:
      - "5432:5432"
    volumes:
      - ./pgdata:/var/lib/postgresql/data

  dash:
    build:
      context: .
      dockerfile: Dockerfile.dash
    container_name: dash_dash
    command: python app.py
    volumes:
      - .:/code
    ports:
      - "80:8080"
    depends_on:
      - pgsql

We create two so called services: a database container running PostgreSQL and a Python container running out app. The PostgreSQL container uses the latest prebuilt image, we call it dash_pgsql and we set some variables to initiate the first database and the standard database user. You can later on certainly add additional users and databases from the psql command line. To do this we export the database port 5432 to the host system so you can use any database you already have tool to manage what’s inside that database. Finally we persist the data using a shared volume in the subdirectory pgdata. This makes sure we see all the data again when we restart the container.
Then we set up a dash container using our previously created Dockerfile.dash to build the image and we call it dash_dash. This sounds a bit superfluous but this way all containers in this project will be prefixed with “dash_“. If you leave that out docker-compose will use the projects directory name as a prefix and append a “_1” to the end. If you later use Docker swarm you will possibly have multiple containers for the same service running and then they will be numbered.
The command that will be run when we start the container is python app.py. We export port 8080 (which we set in the app.py, bear with me) to port 80 on our host. You might have some other process using that port. In this case change the 80 to whatever you like (8080 for example). Finally we declare that this container needs the PostgreSQL service to run before starting. This currently is not needed but will come handy later, since the PostgreSQL containers might be a bit slow in startup. And then your app might start without a valid database resource.

The last building block is our app script itself:

import dash
import dash_core_components as dcc
import dash_html_components as html

external_stylesheets = ['https://codepen.io/chriddyp/pen/bWLwgP.css']

app = dash.Dash(name, external_stylesheets=external_stylesheets)

app.layout = html.Div(children=[
  html.H1(children='Hello Dash'),

  html.Div(children='''
    Dash: A web application framework for Python.
  '''),

  dcc.Graph(
    id='example-graph',
    figure={
      'data': [
        {'x': [1, 2, 3], 'y': [4, 1, 2], 'type': 'bar', 'name': 'SF'},
        {'x': [1, 2, 3], 'y': [2, 4, 5], 'type': 'bar', 'name': u'Montréal'},
      ],
      'layout': {
        'title': 'Dash Data Visualization'
      }
    }
  )
])

if __name__ == '__main__':
  app.run_server(host='0.0.0.0', port=8080, debug=True)

I won’t explain too much of that code here, because this just is the first code example from the Dash manual. But note that I changed the parameters of app.run_server(). You can use any parameter here that the Flask server accepts.

To fire this all up, use first docker-compose build to build the Python image. Then use docker-compose up -d to start both services in the background. To see if they run as ppalnned use docker-compose ps. You should see two services:

Name         Command                         State  Ports
-----------------------------------------------------------------------------
dash_dash    python app.py                   Up     0.0.0.0:80->8080/tcp
dash_pgsql   docker-entrypoint.sh postgres   Up     0.0.0.0:5432->5432/tcp

Now point your browser to http://localhost (or appending whatever port you have used in the docker-compose file) and you should see:
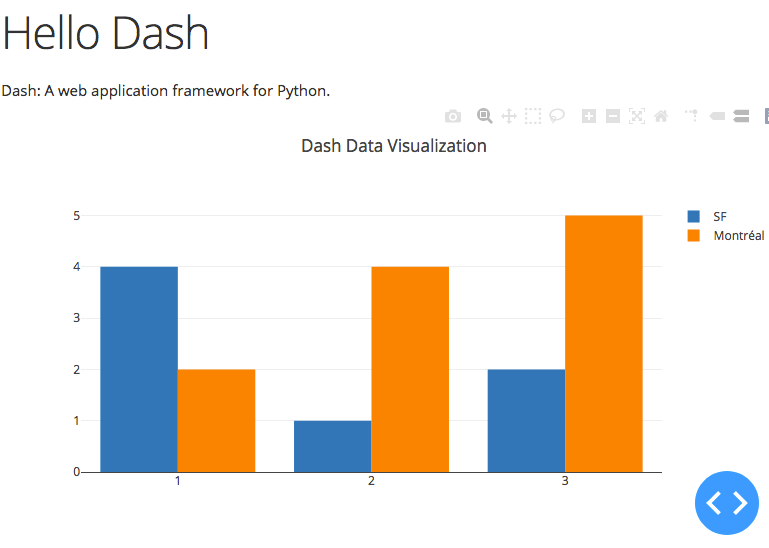
You now can use any editor on your machine to modify the sourcecode in the project directory. Changes will be loaded automatically. If you want to look at the log output of the dash container, use docker-compose logs -f dash and you should see the typical stdout of a Flask application, including the debugger pin, something like:

dash_1 | Running on http://0.0.0.0:8080/
dash_1 | Debugger PIN: 561-251-916
dash_1 | * Serving Flask app "app" (lazy loading)
dash_1 | * Environment: production
dash_1 | WARNING: This is a development server. Do not use it in a production deployment.
dash_1 | Use a production WSGI server instead.
dash_1 | * Debug mode: on
dash_1 | Running on http://0.0.0.0:8080/
dash_1 | Debugger PIN: 231-410-660

Here you will also see when you save a new version of app.py and the web server reloads the app. To stop the environment first use CTRL-c to exit the log tailing and issue a docker-compose down. In an upcoming episode I might show you some more things you cound do with Dash and a database.

Article
0 comment

Why I don’t like hackathons

Disclaimer: I never took part in a hackathon for the reasons I explain here. So all views are deduced from observing those events and their outcome.

Rant

Under which conditions would you say a software project goes bad? Let me gather some I really dislike:

  • We’re in a hurry i.e. we are short in time
  • We are actually so short in time that we can’t complete each and every task
  • We don’t have a good set of requirements
  • Outputting something counts more than doing it right (“quick and dirty is better than nothing”)
  • We have so much work to do that we ignore our health condition (at least for some “sprint time”)

Nearly every condition I mentioned above can be found in a hackathon. Because it is a challenge. Work fast, achieve most. And who attends a hackathon? Young people. Developers starting their career in tech.

What do they learn in a hackathon? Work fast, complete as many tasks as possible. Doing it quick and dirty is perfectly OK. If you don’t have a specification for a task, guess whatever you think will work and implement that. It’s OK to sit 3 days (and I mean DAYS including the nights) in a room and hack right away, ignoring how your body feels.

NO. Just fucking no.

I don’t want people to learn that quick and dirty is the standard way to do things! I don’t want them to learn that scarcity in manpower, time and quality is perfectly acceptable!

To be clear: in every project I worked there are phases when time is short and we needed to do something quick and dirty. But I always try to implement things the best way I can.

“We need people who can fix things quickly!”

Training people to quick and dirty as a standard might be exactly what the organizers aim at. I prefer my coworkers to learn to do things first right and then fast. And to find shortcuts where needed.

Article
0 comment

WoC: Detect non-iterable objects in foreach

https://www.flickr.com/photos/swedpix/36960629121/From time to time we use iterable objects, arrays, objects implementing the \Traversable interface (which iterators also do).

In the old days, real programmers didn’t check for data types, they set sort of canary flags like this:

$obj = SOME DATA;
$isarray = false;
foreach ($obj as $item) {
    $isarray = true;
    // do some stuff like output of $item
}
if ($isarray === false) {
    // didn't get a data array, so output some default message
}

This implements some sort of foreach {…} else {…} construct that PHP doesn’t have. Sure, it works. If you don’t turn on warnings, because if you do, you will be overwhelmed by warnings about foreach trying to act on a non-array/iterable object.

There is a solution: test your data type before running into the foreach! Yes, this means if you can not be 100% sure what sort of object you get, you have to enclose each and every foreach with an if construct. Since PHP 7.1 this block can make use of the is_iterable() function, which returns true, if the given parameter is any kind of iterable object:

$obj = SOME DATA;
if (is_iterable($obj)) {
    foreach ($obj as $item) {
        // do some stuff like output of $item
    }
} else {
    // didn't get a data array, so output some default message
}

For me this looks much better. The result is the same, but without warnings and the purpose is directly intelligible. The former example needs some thinking about the wtf factor of the code.

For PHP versions below 7.1 you can use some sort of polyfill function:

if (!function_exists('is_iterable')) {
    function is_iterable($obj) {
        return is_array($obj) || (is_object($obj) && ($obj instanceof \Traversable));
    }
}

Thanks to the commentators of the PHP manual for this hint.

Article
0 comment

Same procedure as last year: switch dates for daylight savings time in PHP

The same procedure every year: part of the world switches to daylight savings time (DST). Don’t get me started on the topic if there is any sense in doing so. We have to deal with it.

There certainly are functions that deliver the correct time for the current timezone. But what if you would like to know the switch dates in advance? The rule for DST switch dates in Germany is quite simple:we switch to summertime at 2:00 in the morning on the last sunday in march and back to wintertime at 2:00 in the morning of the last sunday in october. So these dates are variable.

Here the PHP DateTimeZone comes to the rescue. The steps are simple enough:

  1. Get a DateTimeZone object for the timezone you’re interested in
  2. Get the transition dates for the year you are interested in by specifying the start and end dates to search for
  3. Clean up the returned array, since it always contains the start date itself

And here is a short piece of code to use:

<?php

$year="2018";

// Get start and end date to search for
$t1=strtotime("$year-01-01");
$t2=strtotime("$year-12-31");

$timezone = new DateTimeZone("Europe/Berlin");
$transitions = $timezone->getTransitions($t1, $t2);

// Delete first element since getTransitions() always returns 3 array elements
// and the first is always the start day itself
array_shift($transitions);

print_r($transitions);
?>

The result is an array with two elements. For 2018 in Germany the results are:

Array
(
    [0] => Array
        (
            [ts] => 1521939600
            [time] => 2018-03-25T01:00:00+0000
            [offset] => 7200
            [isdst] => 1
            [abbr] => CEST
        )

    [1] => Array
        (
            [ts] => 1540688400
            [time] => 2018-10-28T01:00:00+0000
            [offset] => 3600
            [isdst] =>
            [abbr] => CET
        )

)


Article
0 comment

Use a private repository as source of a composer package

Sometimes I need to make a small change to a composer package, often in a Symfony project. It is a really bad idea to just go into the vendor directory of the package and change some code. It’s much better to fork the corresponding repository, apply your change and build a new release. Then you can use that in a composer.json file.

Fork the repository

For the purpoe of demonstration I will create a customized version of Javier Eguiluz’s EasyAdmin bundle for Symfony. So go to the github page of the EasyAdmin bundle and click on the “Fork” button in the top right corner. Github will create a fork for you under your own user account. Clone that repository and make your changes. For this is one line in the file src/Form/Util/LegacyFormHelper.php as I mentioned in the last posting.

Build a new release

Now we’re ready to build a new release. Go to the “releases” tab in your forked repository and click on “Draft a new release”. Define a new tag version (unimportant how you call it, I normally just count up the original release version). I normally enter something like “for private use only” into the “Release title” field but you just can leave that empty. Once you’re done you can submit via “Publish release”. You will be brought back to the release list and see your new release tagged with a green label saying “Latest release”. You just built your first release \o/

Use the release in a composer.json file

You now can change your composer.json file. First you need to add the repository. By default composer will look up the packagist repository. If you define a different one in the json file this local one will be searched first before falling back to the public repo. So we need to create a repository section and list the github repository. Mine looks like this:

"repositories": [
    { "type": "vcs", "url": "git@github.com:vmgforks/EasyAdminBundle.git" }
],

The type is “vcs” (version control system) and the URL is your forked repository. I like to keep forks in a organization of its own called “vmgforks”. Now we can require the package by using its original name and the required version just is “*”:

"javiereguiluz/easyadmin-bundle": "*",

Now update the composer.lock and download and install the package by:

composer update

Now you can check if the change made it to the vendor directory.

Article
3 comments

Getting to work the CKEditor plugin for EasyAdmin in Symfony 4

Developing with Symfony 4 can sometimes be a bit challenging as some of the most widely used bundles are not yet ported to Symfony 4 or never will be (like FOSUserBundle). And sometimes a bundle works pretty well but one of its third party plugins/bundles doesn’t. This is the case with the brilliant EasyAdmin bundle. Sometimes you might want to offer a WYSIWYG editor to a backend user. For this case there is a bundle called IvoryCKEditorBundle that integrates the famous CKEditor into the form component. But the Ivory bundle not (yet) supports Symfony 4 so a helpful soul created a fork and called the package hillrange/ckeditor so you can use CKEditors in nearly any form.

Nearly any but not EasyAdmin. We come to that later. First let’s see how it would work if it worked (that is a sentence, isn’t it?). In Symfony 4 the EasyAdmin config can be found in config/packages/easy_admin.yaml. For a simple entity that only contains a text attribute (of type “text” who would have guessed?) that we would like to WYSIWYG edit it would look something like this:

easy_admin:
  entities:
    entry:
      class: App\Entity\Entry
      form:
        fields:
          - { property: 'text', type: 'ckeditor', type_options: { trim: true } }

The field type is called “ckeditor”. For this to work EasyAdmin has an array of supported field types and this out of the box also contains an entry for the ckeditor type. It can be found in vendor/javiereguiluz/easyadmin-bundle/src/Form/Util/LegacyFormHelper.php and is called $supportedTypes. And this is why the Hillrange package doesn’t play well with EasyAdmin. The form class just has another name. The original line reads

'ckeditor' => 'Ivory\\CKEditorBundle\\Form\\Type\\CKEditorType',

and can be changed into

'ckeditor' => 'Hillrange\\CKEditor\\Form\\CKEditorType',

Doing so in the original EasyAdmin bundle in the vendor directory is a bad idea. My approach is a bit overkill but offers a clean and regular approach:

  1. Fork the EasyAdmin bundle on github
  2. Change the incriminating line as proposed
  3. Build a release of “your own EasyAdmin”
  4. Include that with the composer.json file to be pulled directly from github

How the latter works will be subject to the next posting. So stay tuned ;)

PS: At some point in the future the IvoryCKEditorBundle will be Symfony 4 ready (at least I hope so) and you will be able to turn back the composer.json entry to the original package.

Article
0 comment

Docker based dev environment with PHP 7, MariaDB, phpMyAdmin, Mailhog & ELK stack

Docker can be used as a flexible development environment for (web) applications. With docker-compose you can add up several services to a complete scenario. Here I would like to present a new setup that contains a lot of things to make a developers life more comfortable, notably:

If you don’t need all these components, you always can disable whatever you’re not going to use. Your application will reside in the html subdirectory, the MySQL/MariaDB db files will be in the mysql directory so nothing is lost when you shut down the services.

If you need something else (PostgreSQL e.g.) please let me know and I will add it. Have fun!

Article
7 comments

How to install dependencies from a requirements.txt file with conda

Just a little reminder: pip has this very useful option to install a bunch of packages from a single text file mostly called requirements.txt. Anaconda’s command line tool conda doesn’t support this option directly. It does support reading the package names from a file using the –yes and –file option
conda install --yes --file requirements.txt

but that does not automatically install all the dependencies. To do this, we need to iterate over the file and install each package in “single package mode”:

while read requirement; do conda install --yes $requirement; done < requirements.txt

Thanks to Luis Capelo for this snippet which I use to install dependencies in a dockerized instance of Anaconda / Jupyter (more on that in a later post).

Article
0 comment

Docker automation for PHP Developers using Python

Introduction

This posting will deal with using Docker on the developer desktop. I will not talk about deploying these containers to other stages of the track to production. Maybe this is a topic for a follow-up by me or by someone who is more apt with all things devops.

All this started when I realized, that docker-compose.yml needs an absolute path on the host for its shared volumes. This is OK but when you would like to have multiple development setups for multiple projects. What I wanted was a single config file to rule a complete set of Dockerfile and docker-compose.yml files. And a comandline tool to manage that environment without the need to juggle around with several other tools and numerous options and flags.

An intermediary state consisted of a Makefile with several shell scripts for all the stuff that was hard to do in Makefiles. It worked but was a bunch of files. I wanted something cleaner with more possibilities for the future and fewer helper files.

So here it is: a Python file to rule them all (sorry for the pun …) and build Dockerfile and docker-compose.yml from templates and a config.yml file when booting up the environment. The repository is here: https://github.com/vgoebbels/docker-php7

What you get

  • An Apache running PHP7.1 on http://localhost with document root (/var/www/html) as a shared volume in the www subdirectory
  • A MySQL database connected to that PHP container
  • A PHPMyAdmin listening on http://localhost:8080

Usage

  1. Check out from the Github repo above. Don’t mind the actual path to your environment. This will be determined and inserted into the docker-compose.yml file by the Python script.
  2. Install the required Python modules with
    pip install -r requirements.txt
  3. Have a look at the templates in the templates subfolder
  4. Edit the configuration options in config.yml
  5. Boot the setup using
    ./dockshell up
  6. Have a look at the running containers with
    ./dockshell status

What doesn’t work yet

Using ./dockshell sshweb and ./dockshell sshsql to log into the running containers. Was not able to enter interactive mode. You will have to use:

docker container exec -it <CONTAINERNAME_HERE> /bin/bash

Caveats

  • ./dockshell clean removes all containers and images. And I mean all of them. This needs to be fixed!


Article
1 comment

Note to self: bash path hashing /o\

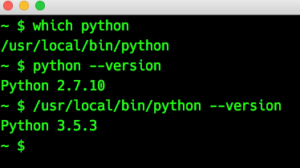
Did you ever stumble across something like this:

Yes, this is strange, isn’t it? The PATH variable is set in the correct order (this is why ‘which’ finds the local Python). Googling about this behavior at first didn’t bring up any solution. But then I came across this now closed question on Stackoverflow.

So once you know what you are looking for Google reveals lots and lots of people having trouble with path hashing. Now, my solution was quite simple:

~ $ type python
python is hashed (/usr/bin/python)
~ $ hash -t python
/usr/bin/python
~ $ hash -d python
~ $ hash -t python
-bash: hash: python: not found
~ $ which python
/usr/local/bin/python
~ $ python --version
Python 3.5.3

PS: To clear the complete bash path cache just use “hash -r”.